> ## Documentation Index
> Fetch the complete documentation index at: https://docs.portalhq.io/llms.txt
> Use this file to discover all available pages before exploring further.
# Apple OAuth
> Set up Sign in with Apple, register Portal's return URL, and let your users sign in with their Apple account.
Portal identifies an End User by their email address, and Sign in with Apple lets
users hide theirs. When an End User picks **Hide My Email**, Apple gives Portal a
private relay address such as `abc123@privaterelay.appleid.com` instead of their
real one, and that relay address is what Portal stores.
The consequence is that the same person is two separate end users, with two
separate wallets, if they sign in with Apple using a relay address and with
another method using their real address. Read
[How Apple handles email addresses](#how-apple-handles-email-addresses) before you
offer Apple alongside Google or magic links.
## Step 1: Find your Team ID
Sign in to the [Apple Developer](https://developer.apple.com/account) portal. Your
**Team ID** is shown in the Membership details section. It is a ten-character
value such as `A1B2C3D4E5`.
## Step 2: Create an App ID
1. Go to **Certificates, Identifiers & Profiles > Identifiers**.
2. Add an identifier and choose **App IDs**, then **App**.
3. Set a description and a **Bundle ID** in reverse-domain form, for example
`com.example.app`.
4. Under **Capabilities**, enable **Sign in with Apple**.
5. Save. The Bundle ID is the value you will enter into Portal as the **App ID**.
## Step 3: Create a Services ID
The Services ID is the identifier Apple treats as the OAuth client for web
sign-in. It is a separate identifier from the App ID.
1. In **Identifiers**, add another identifier and choose **Services IDs**.
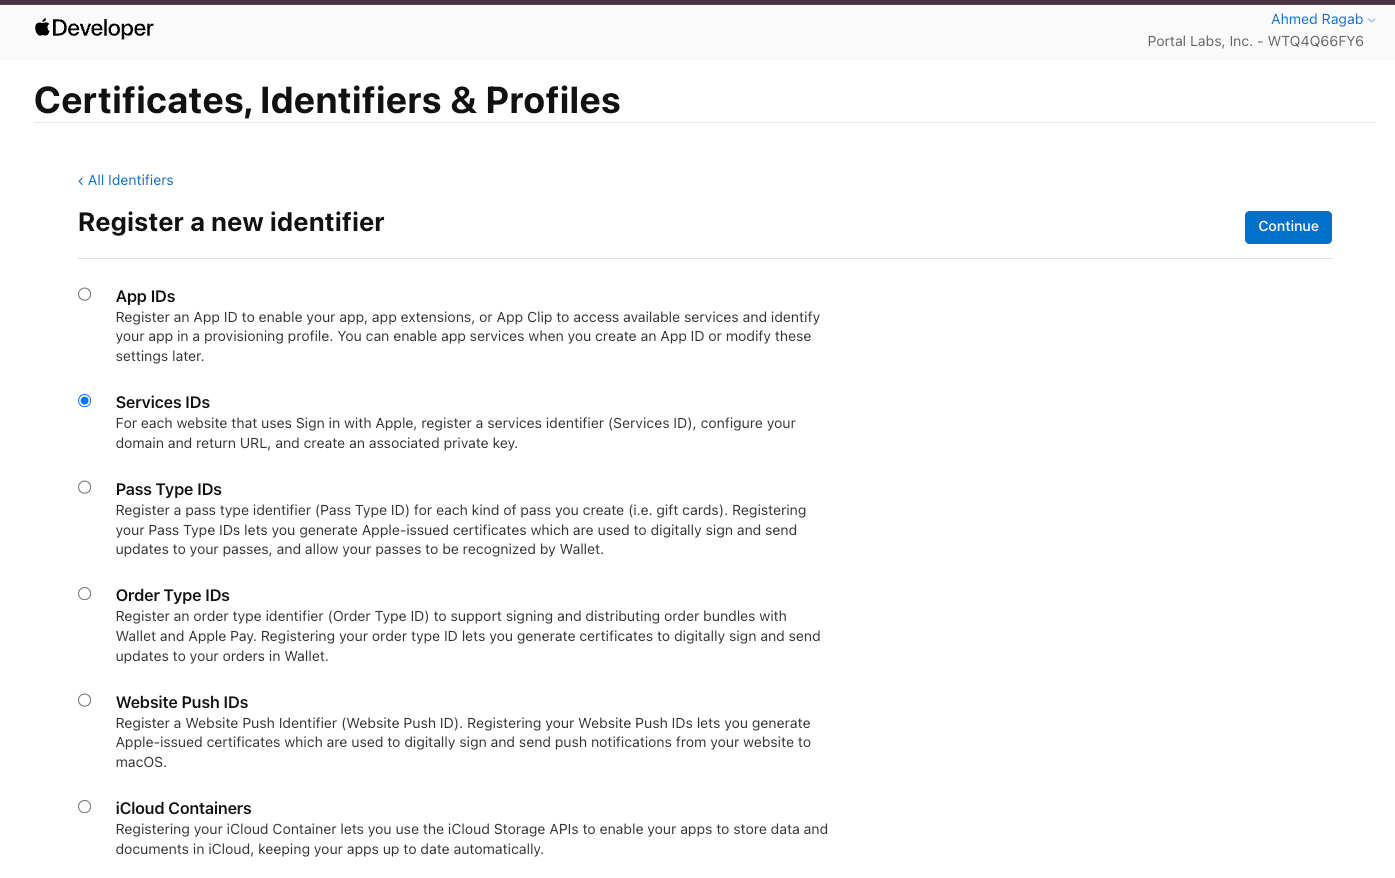 2. Set a description and an identifier, for example `com.example.auth`. This is
the value you will enter into Portal as the **Service ID**.
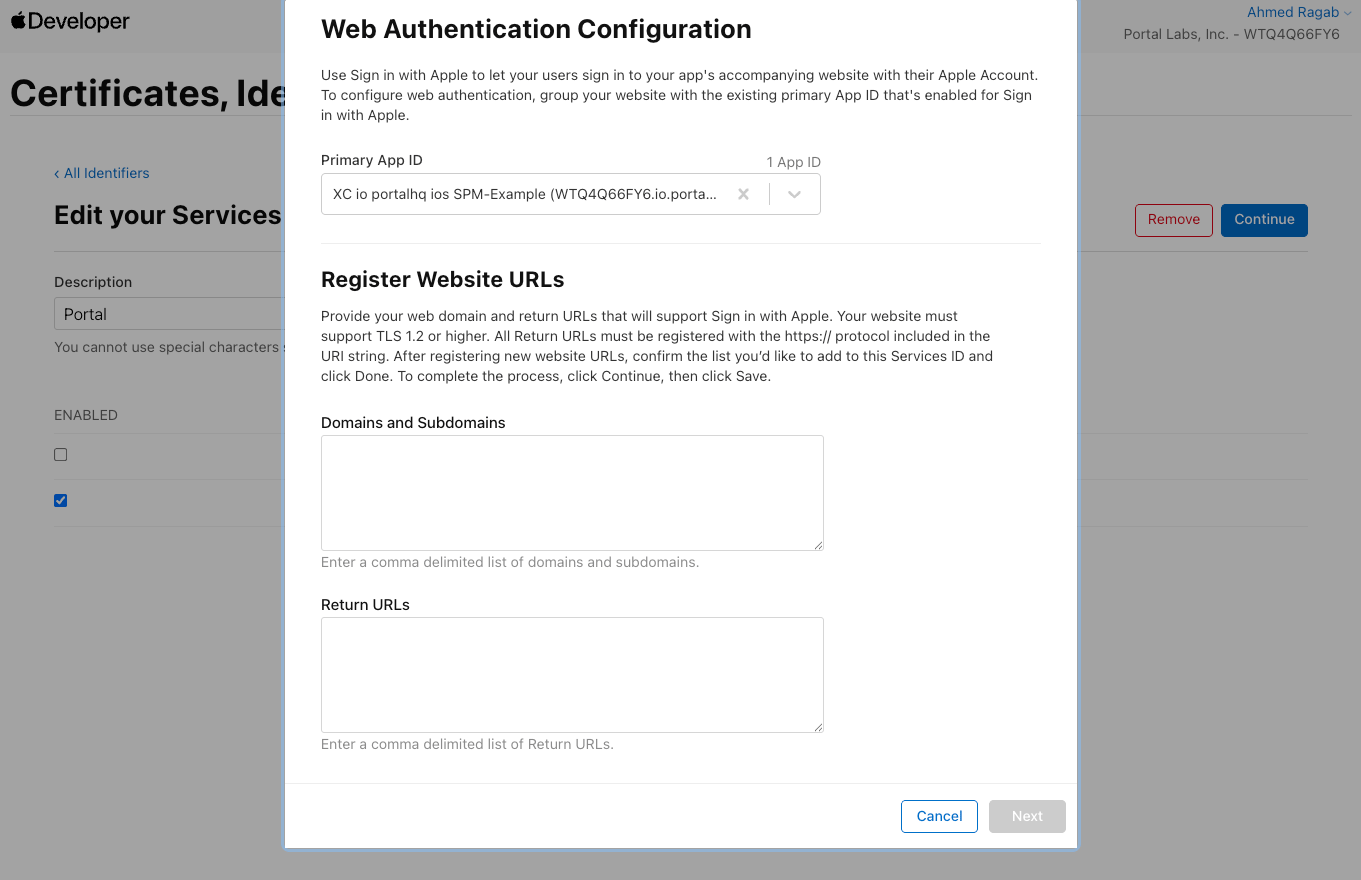
3. Save, then reopen the Services ID and enable **Sign in with Apple**.
4. Click **Configure** and set:
* **Primary App ID**: the App ID from step 2.
* **Domains and Subdomains**: `api.portalhq.io`
* **Return URLs**: the Portal callback URL for each environment, as described
in [The return URL Apple needs](#the-return-url-apple-needs).
2. Set a description and an identifier, for example `com.example.auth`. This is
the value you will enter into Portal as the **Service ID**.
3. Save, then reopen the Services ID and enable **Sign in with Apple**.
4. Click **Configure** and set:
* **Primary App ID**: the App ID from step 2.
* **Domains and Subdomains**: `api.portalhq.io`
* **Return URLs**: the Portal callback URL for each environment, as described
in [The return URL Apple needs](#the-return-url-apple-needs).
 5. Save.
### The return URL Apple needs
The Apple OAuth process should redirect to **Portal**,
which verifies the sign-in with Apple and then redirects the user on to your
Redirect URL. The return URL you register with Apple is therefore a Portal URL:
```
https://api.portalhq.io/api/v3/auth/oauth/callback/
```
Replace `` with the Auth Environment ID from
**Authentication > Configure**. Each environment has a different Auth Environment
ID, so **register a return URL for each environment** you plan to use.
Apple requires the return URL to match exactly. No trailing slash, `https` only,
and the Auth Environment ID has to be correct. A mismatch fails the sign-in
before the user returns to your app.
## Step 4: Create a Sign in with Apple key
1. Go to **Certificates, Identifiers & Profiles > Keys**.
2. Add a key, give it a name, and enable **Sign in with Apple**.
3. Click **Configure** and select the App ID from step 2 as the primary App ID.
4. Register the key and download the `.p8` file.
5. Note the **Key ID** shown on the key's page.
The `.p8` file can only be downloaded once. Store it somewhere safe. If you lose
it you have to revoke the key and create a new one.
## Step 5: Enter the credentials in Portal
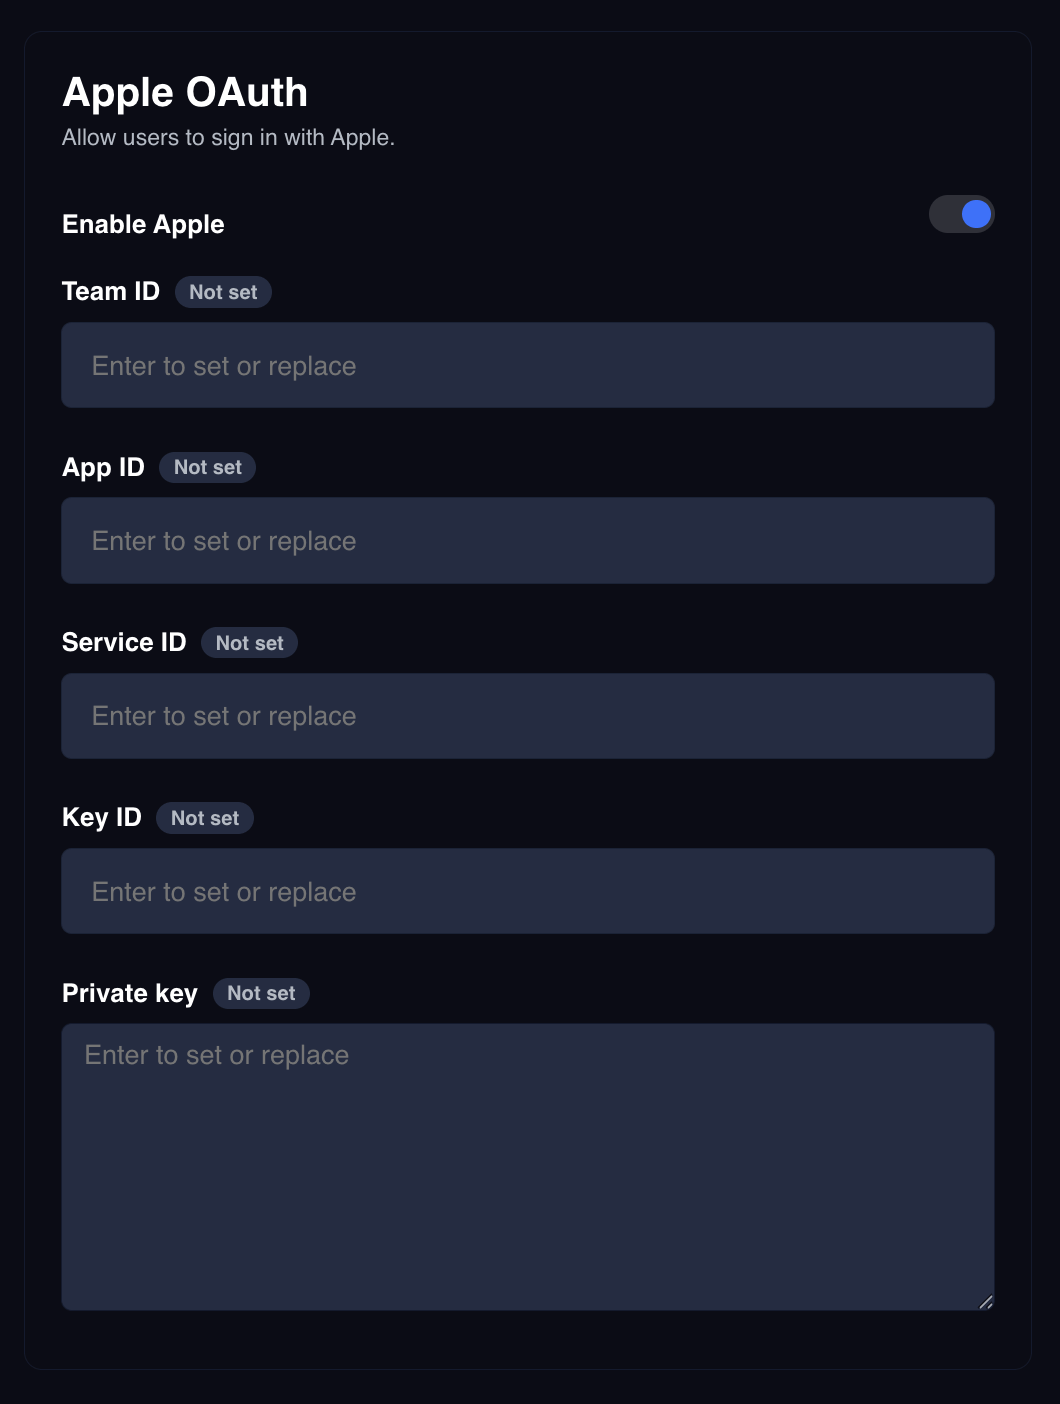
**Information from Apple (to enter in Portal):**
* **Team ID**: your ten-character Apple team identifier
* **App ID**: the Bundle ID from step 2, for example `com.example.app`
* **Service ID**: the Services ID from step 3, for example `com.example.auth`
* **Key ID**: the identifier of the key from step 4
* **Private key**: the full contents of the `.p8` file
1. In the dashboard, click **Configure** in the left sidebar, under
Authentication, and select the environment.
2. In the **Apple OAuth** section, turn on the toggle.
3. Fill in all five fields and save.
5. Save.
### The return URL Apple needs
The Apple OAuth process should redirect to **Portal**,
which verifies the sign-in with Apple and then redirects the user on to your
Redirect URL. The return URL you register with Apple is therefore a Portal URL:
```
https://api.portalhq.io/api/v3/auth/oauth/callback/
```
Replace `` with the Auth Environment ID from
**Authentication > Configure**. Each environment has a different Auth Environment
ID, so **register a return URL for each environment** you plan to use.
Apple requires the return URL to match exactly. No trailing slash, `https` only,
and the Auth Environment ID has to be correct. A mismatch fails the sign-in
before the user returns to your app.
## Step 4: Create a Sign in with Apple key
1. Go to **Certificates, Identifiers & Profiles > Keys**.
2. Add a key, give it a name, and enable **Sign in with Apple**.
3. Click **Configure** and select the App ID from step 2 as the primary App ID.
4. Register the key and download the `.p8` file.
5. Note the **Key ID** shown on the key's page.
The `.p8` file can only be downloaded once. Store it somewhere safe. If you lose
it you have to revoke the key and create a new one.
## Step 5: Enter the credentials in Portal
**Information from Apple (to enter in Portal):**
* **Team ID**: your ten-character Apple team identifier
* **App ID**: the Bundle ID from step 2, for example `com.example.app`
* **Service ID**: the Services ID from step 3, for example `com.example.auth`
* **Key ID**: the identifier of the key from step 4
* **Private key**: the full contents of the `.p8` file
1. In the dashboard, click **Configure** in the left sidebar, under
Authentication, and select the environment.
2. In the **Apple OAuth** section, turn on the toggle.
3. Fill in all five fields and save.
 Paste the private key exactly as it appears in the `.p8` file, including the
`-----BEGIN PRIVATE KEY-----` and `-----END PRIVATE KEY-----` lines.
All five fields are write-only. After saving, each shows that a value is stored
rather than the value itself. To replace one, type the new value and save. To
leave a stored value alone, leave its field empty.
## Step 6: Sign a user in
### Get the authorize URL
```bash theme={null}
curl --request GET \
--url 'https://api.portalhq.io/api/v3/auth/oauth/urls?redirectUrl=https%3A%2F%2Fexample.com%2Fcallback' \
--header 'x-portal-auth-environment-id: '
```
```json theme={null}
{
"data": {
"apple": "https://appleid.apple.com/auth/authorize?client_id=com.example.auth&..."
},
"metadata": null
}
```
The response contains an `apple` key only if Apple is enabled on the environment.
`redirectUrl` must be URL-encoded and must exactly match one of your Redirect
URLs.
### Send the user to Apple
Open `data.apple` in a browser. The user signs in and consents, choosing whether
to share their real email address or use Apple's private relay.
Apple posts the result to Portal, Portal verifies it, and Portal redirects the
user to your Redirect URL:
```
https://example.com/callback?token=&login_type=APPLE
```
### Exchange the token
```bash theme={null}
curl --request POST \
--url https://api.portalhq.io/api/v3/auth/oauth/tokens \
--header 'x-portal-auth-environment-id: ' \
--header 'Content-Type: application/json' \
--data '{ "token": "" }'
```
```json theme={null}
{
"data": {
"endUserId": "clx1enduser00000000000000",
"clientSessionToken": "b7c1f0a2-3d4e-5f60-8a91-2b3c4d5e6f70",
"userJwt": null,
"totpLink": null
},
"metadata": null
}
```
If the environment requires a second factor, `clientSessionToken` is `null` and
`userJwt` is set. See
[Two-factor authentication](/resources/authentication/two-factor-authentication).
## Handle a failed sign-in
If the user cancels, or the exchange fails, Portal redirects them to your Redirect
URL with an error instead of a token:
```
https://example.com/callback?error=oauth_failed
```
Check for `error` before looking for `token` on your callback page, and offer the
user another attempt.
## How Apple handles email addresses
Portal identifies an end user by email address, and Apple's behaviour around
email is worth knowing about.
* Apple only returns the user's email on their **first** consent for a given
Services ID. Portal records it then and recognizes the user by their Apple
account on later sign-ins.
* If Apple does not supply an email, Portal cannot create the end user and the
sign-in fails. In practice this happens when a user has previously consented
under a different configuration.
* If the user chooses **Hide My Email**, Apple supplies a private relay address
such as `abc123@privaterelay.appleid.com`. That relay address is what Portal
stores, so a user who signs in with Google/Magic Links using their real address
and with Apple using a relay address is treated as **two separate end users**, each with
their own wallet.
Relay addresses are stable, so a user who returns via Apple with **Hide My Email**
lands on the same end user and the same wallet each time. The mismatch only shows
up when the same person also uses a different sign-in method.
If you offer more than one method, decide up front how you want this to behave.
Presenting Apple as the only option avoids the problem entirely, as does treating
the two sign-ins as genuinely separate accounts. What does not work is assuming a
person is one end user regardless of how they signed in.
## Next steps
Add a TOTP second factor to every sign-in.
Full reference for the OAuth endpoints.
Paste the private key exactly as it appears in the `.p8` file, including the
`-----BEGIN PRIVATE KEY-----` and `-----END PRIVATE KEY-----` lines.
All five fields are write-only. After saving, each shows that a value is stored
rather than the value itself. To replace one, type the new value and save. To
leave a stored value alone, leave its field empty.
## Step 6: Sign a user in
### Get the authorize URL
```bash theme={null}
curl --request GET \
--url 'https://api.portalhq.io/api/v3/auth/oauth/urls?redirectUrl=https%3A%2F%2Fexample.com%2Fcallback' \
--header 'x-portal-auth-environment-id: '
```
```json theme={null}
{
"data": {
"apple": "https://appleid.apple.com/auth/authorize?client_id=com.example.auth&..."
},
"metadata": null
}
```
The response contains an `apple` key only if Apple is enabled on the environment.
`redirectUrl` must be URL-encoded and must exactly match one of your Redirect
URLs.
### Send the user to Apple
Open `data.apple` in a browser. The user signs in and consents, choosing whether
to share their real email address or use Apple's private relay.
Apple posts the result to Portal, Portal verifies it, and Portal redirects the
user to your Redirect URL:
```
https://example.com/callback?token=&login_type=APPLE
```
### Exchange the token
```bash theme={null}
curl --request POST \
--url https://api.portalhq.io/api/v3/auth/oauth/tokens \
--header 'x-portal-auth-environment-id: ' \
--header 'Content-Type: application/json' \
--data '{ "token": "" }'
```
```json theme={null}
{
"data": {
"endUserId": "clx1enduser00000000000000",
"clientSessionToken": "b7c1f0a2-3d4e-5f60-8a91-2b3c4d5e6f70",
"userJwt": null,
"totpLink": null
},
"metadata": null
}
```
If the environment requires a second factor, `clientSessionToken` is `null` and
`userJwt` is set. See
[Two-factor authentication](/resources/authentication/two-factor-authentication).
## Handle a failed sign-in
If the user cancels, or the exchange fails, Portal redirects them to your Redirect
URL with an error instead of a token:
```
https://example.com/callback?error=oauth_failed
```
Check for `error` before looking for `token` on your callback page, and offer the
user another attempt.
## How Apple handles email addresses
Portal identifies an end user by email address, and Apple's behaviour around
email is worth knowing about.
* Apple only returns the user's email on their **first** consent for a given
Services ID. Portal records it then and recognizes the user by their Apple
account on later sign-ins.
* If Apple does not supply an email, Portal cannot create the end user and the
sign-in fails. In practice this happens when a user has previously consented
under a different configuration.
* If the user chooses **Hide My Email**, Apple supplies a private relay address
such as `abc123@privaterelay.appleid.com`. That relay address is what Portal
stores, so a user who signs in with Google/Magic Links using their real address
and with Apple using a relay address is treated as **two separate end users**, each with
their own wallet.
Relay addresses are stable, so a user who returns via Apple with **Hide My Email**
lands on the same end user and the same wallet each time. The mismatch only shows
up when the same person also uses a different sign-in method.
If you offer more than one method, decide up front how you want this to behave.
Presenting Apple as the only option avoids the problem entirely, as does treating
the two sign-ins as genuinely separate accounts. What does not work is assuming a
person is one end user regardless of how they signed in.
## Next steps
Add a TOTP second factor to every sign-in.
Full reference for the OAuth endpoints.